 Material Add Round Plate ( Modeling )
Tool summary :
Also see :
- Plate Material (topic)
- Miscellaneous members versus legacy miscellaneous members (topic)
- Round plate miscellaneous member (instead of legacy)
- Round Plate Material window (opens when you add round plate as a submaterial or a legacy misc member)
- Add Material
- Show legacy miscellaneous members in member add screen (for adding a legacy misc mem using F2 )
page 1 | contents | add material | add legacy misc mem | round plate window
Adding a round plate material or legacy miscellaneous member :
1 . Round plate can be added to the 3D model as a submaterial of a member or as a legacy miscellaneous member. In either case, locating work points should be done in a view whose work plane is orthogonal to (at right angles to) the material or legacy miscellaneous member being added. Do one (1) of the following:
To add a round plate TO a member (pre-selection method):
- Select the one (1) member that you want to add the material to (so that it is displayed in the " Primary selection color ") > press F3 > filter for "
Plate / Bar " > double-click " Round Plate " > continue to step 2.
- Instead of using F3, you can activate the Add Round Plate tool by clicking the icon represented at the top of this page or by using a keyboard shortcut or by using the classic menu system or etc.
To add a round plate AS a legacy miscellaneous member: Confirm that the box is checked for User and Site Options > Site > "
2 . The status line prompts, " Add: .. ." Locate- Pan -Return mouse bindings become active. Select the appropriate Locate option, then do either of the following:
|
|
|
bindings |
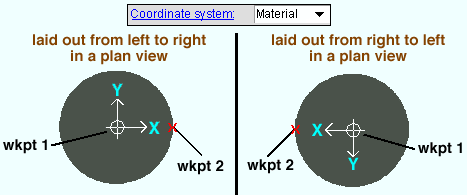
Alternative 1 : Left-click ( Locate ) at two different locations to define the radius of the round plate to be in the plane of your current view. The first point establishes the material reference point (the pivot point around which any subsequent rotation takes place). Twice the distance between these two points is entered to the " Plate diameter " field on the Round Plate Material window.
Alternative 2 : Left-click ( Locate ) twice at the same location to define a cross section. The faces of the round plate will be perpendicular to your current view. These points also establish the location of the material reference point .

3 . After you are done laying out work points, the Round Plate Material window opens. On it are settings for the round plate you are adding.
3a (optional) : Enter a " Plate diameter " if you laid out this round plate by locating two points at the same location.
3b : Choose the " Thickness reference point " of the material and thus specify whether you want the near side, far side or center of the plate at the elevation (or relative depth) of the view in which you entered its work points (if you entered the plate by designating two work points).
3c : Press the " OK " button at the bottom of the Round Plate Material window to close the window and apply the settings you have entered.
4 . The Rotate Material window opens, and a preview of the to-be-added round plate is shown on screen. Do one (1) of the following:
Alternative 1 : Press " Cancel " to back up to step 2 . This stops the round plate from being added.
Alternative 2 : To accept the material's present rotation, press the " OK " button.
Alternative 3 : Change the material's rotational settings and then press " OK " if you want to rotate the material around various axes that originate at the first work point that you located in step 2.
5 : Different end steps are required depending on whether you are adding a material to a member or adding a stand-alone legacy miscellaneous member.
End steps for adding a material TO a member: After rotating the material into place > right-click ( Return ) if done adding material to the member > Change All Options can be applied if the member the material is being added to is batched together with other members with the same mark.
End steps for adding a material AS a legacy miscellaneous member: After rotating the legacy miscellaneous member into place > right-click ( Return ) when you are done.
Tip 1: If you added a legacy miscellaneous member (see step 1), you cannot re-open the Round Plate Material window using Edit Member -- that opens the [Legacy] Miscellaneous Member Edit window. Round Plate Material is a material window, not a member window, and you therefore have to open it by, for example, using Edit One Material , " Edit Other " on the context menu, or by double-clicking the material in the Model Tree .
Tip 2: If you added this material as a submaterial (see step 1), you can, in addition to the edit methods described in tip 1, double-click the material to re-open the Round Plate Material window.
page 1 | contents | add material | add legacy misc mem | round plate window | top